
Learning and teaching are my passions, and one of my favorite learning platforms is Domestika! Over the past couple of years, I have purchased ten of their courses and enjoyed every one of them to varying degrees. Recently, Domestika changed its pricing structure to a flat fee of $19.99 per class or $109 for unlimited courses per year. For those who prefer to buy one at a time, the price still remains incredibly reasonable. As someone who’s been overwhelmed by too many options before (looking at you, Skillshare), the single class option is a plus!
Domestika’s classes are next-level awesome. I’ve previously raved about the course “Mixed Media Animation in Procreate” by Caroline Kjellberg, which totally transformed my workflow in AE. Currently, I’m knee-deep in “Introduction to Children’s Illustration” by Adolfo Serra and “Graphic Design for Beginners” by Silvia Ferpal. Both are jam-packed with information, making them a bit longer to complete- but I’m loving every second.

Before the price changes, I snagged “Digital Animation with Experimental Techniques” by Danaé Gosset for just $8.99—an absolute steal! From the get-go, I learned so much. The course felt like an apprenticeship, guiding me through the creative process, from materials and references to production and final touches. Simply invaluable!
But it wasn’t all smooth sailing. I didn’t have Cinema 4D, so I used Procreate to make the animation sequence . Then, I realized the InDesign squares were a bit on the small side when printed, so I had to switch from the more clunky oil pastels to some old acrylic paint that I had on hand from my teaching days. My scanner? Not great, but it got the job done. However, the mission was more about learning the process of bringing analog animation back into digital form and less about the final product. Of course, I would do many things differently next time, but in this case…I’m calling it a success!
Here’s a quick rundown of my process:
- Procreate: Created a 2D animation sequence of shapes.
- InDesign: Imported the Procreate sequence.
- Print: Printed the sequence on paper.
- Painted: Hand-painted each frame.
- Scan: Scanned each page back into the computer.
- Photoshop: Cleaned up the frames.
- After Effects: Brought the frames into After Effects, color corrected, and rendered the final results.
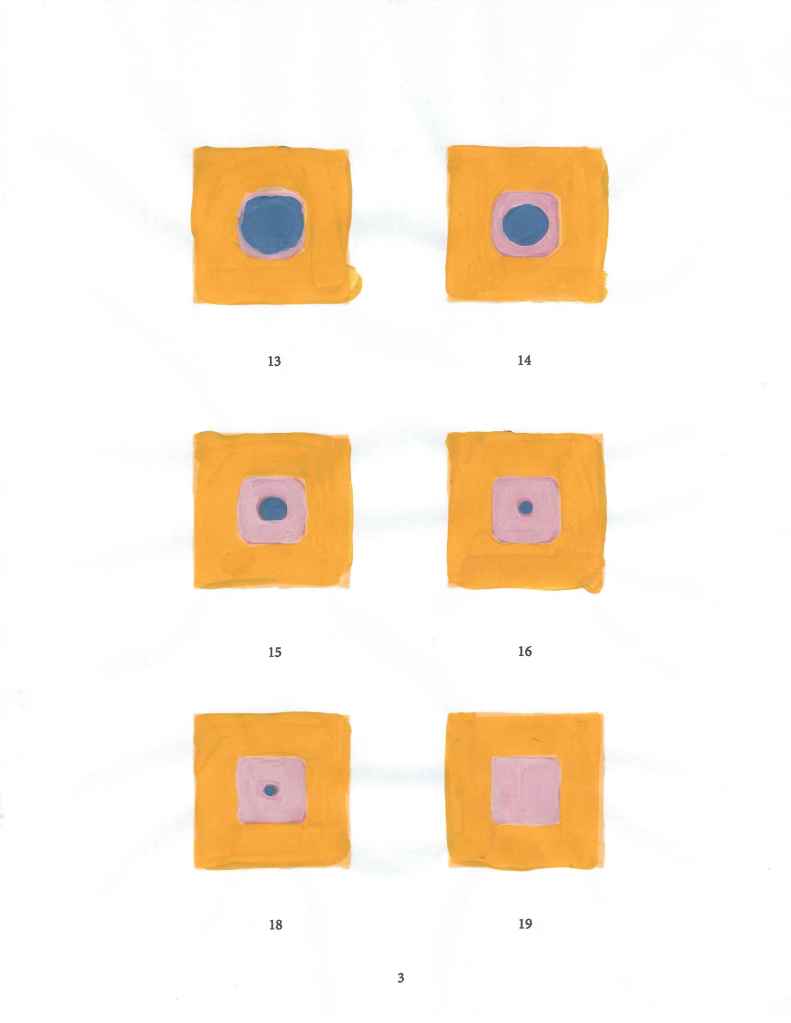
<- Sample of the painted sequence, scanned back into the computer.
Tip: Do not animate 46 frames on your first attempt!
What a fun project! There is always something rewarding about making something move, but using my hands and not just the screen was an added bonus. I am already working on another analog-ital animation—though perhaps just using 12 frames this time 😉
Learning through Domestika has been an absolutely incredible journey! I’m so thrilled to keep growing my skills. If you love learning and creating as much as I do, you’re going to adore Domestika! This isn’t a paid ad, but hey…if Domestika wants to sponsor me to keep taking classes and blogging about it… 🎨📚✨


Leave a Reply